一、下载Jenkins
1.Ubuntu
包含在默认Ubuntu软件包中的Jenkins版本往往落后于项目本身的最新版本。 为了利用最新的修复和功能,我们将使用项目维护的软件包来安装Jenkins。
首先,我们将存储库密钥添加到系统。
1 | $ wget -q -O - https://pkg.jenkins.io/debian/jenkins-ci.org.key | sudo apt-key add - |
添加密钥后,系统将返回OK 。 接下来,我们将Debian包存储库地址附加到服务器的sources.list :
1 | $ echo deb http://pkg.jenkins.io/debian-stable binary/ | sudo tee /etc/apt/sources.list.d/jenkins.list |
当这两个都到位时,我们将运行update ,以便apt-get将使用新的存储库:
1 | $ sudo apt-get update |
最后,我们将安装Jenkins及其依赖项,包括Java:
1 | $ sudo apt-get install jenkins |
现在Jenkins及其依赖项已经到位,我们将启动Jenkins服务器。
2.Centos7
Add the repository key with the following command:
1 | rpm --import https://pkg.jenkins.io/redhat-stable/jenkins.io.key |
Now we will add the package repository address to our repository list with the command below:
1 | sudo wget -O /etc/yum.repos.d/jenkins.repo https://pkg.jenkins.io/redhat-stable/jenkins.repo |
Update your package manager list to get the latest packages:
1 | yum repolist |
Finally, install Jenkins and JAVA with the following command:
1 | yum install java-1.8.0-openjdk jenkins |
二、安装Jenkins
使用systemctl我们将启动Jenkins:
1 | # 使用systemctl我们将启动Jenkins: |
If you want to make it run at startup execute the command below as well:
1 | systemctl enable jenkins |
由于systemctl不显示输出,我们将使用其status命令来验证它是否成功启动:
1 | $ systemctl status jenkins |
如果一切顺利,输出的开始应显示服务处于活动状态,并配置为启动时启动:
1 | ● jenkins.service - LSB: Start Jenkins at boot time |
现在Jenkins正在运行,我们将调整防火墙规则,以便我们可以从网络浏览器到达Jenkins以完成初始设置。
接着安装
我们打开 http://localhost:8080 按照流程安装即可。
三、安装部署Gitbook
安装Gitbook的前提条件是需要有NodeJS和npm,这个在Ubuntu和centos安装NodeJS记录,自行查阅。
这里就直接安装了:
1 | $ sudo npm install -g gitbook-cli |
值得注意的是我们的book的格式需要严格遵循他的准则:
1 | ubuntu@VM-19-176-ubuntu:~$ tree -L 1 gitbook/ |
在这个项目下进行gitbook的操作
1 | # 初始化 |
四、配置Jenkins
第二部安装Jenkins时,我选择的是默认安装,所以不需要再独自安装github插件。
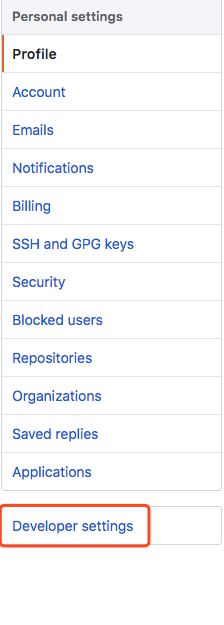
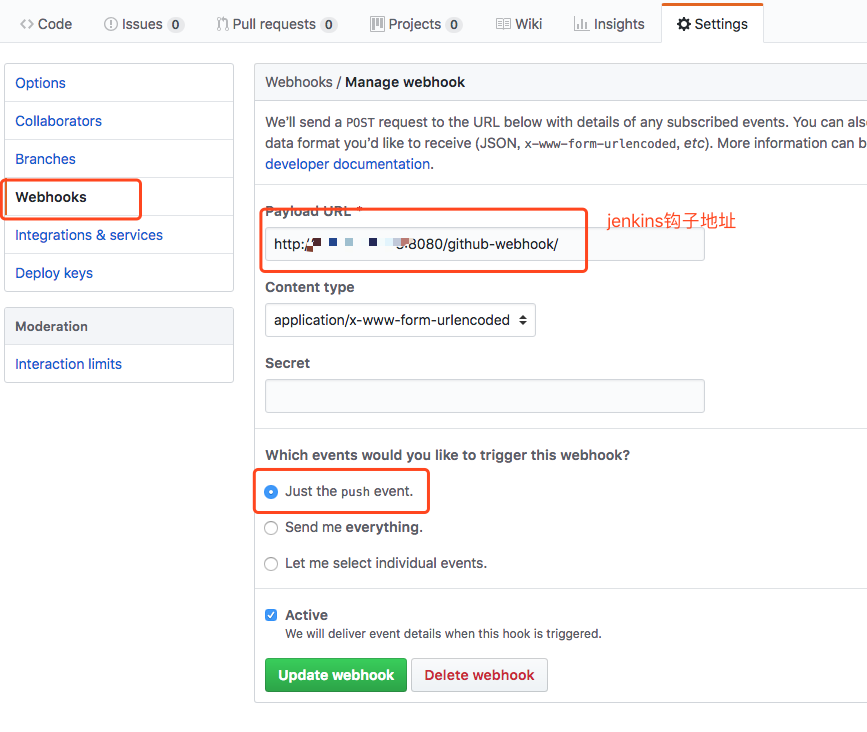
- 第一步,获取github的开发者秘钥,后续我们jenkins中配置需要使用秘钥验证
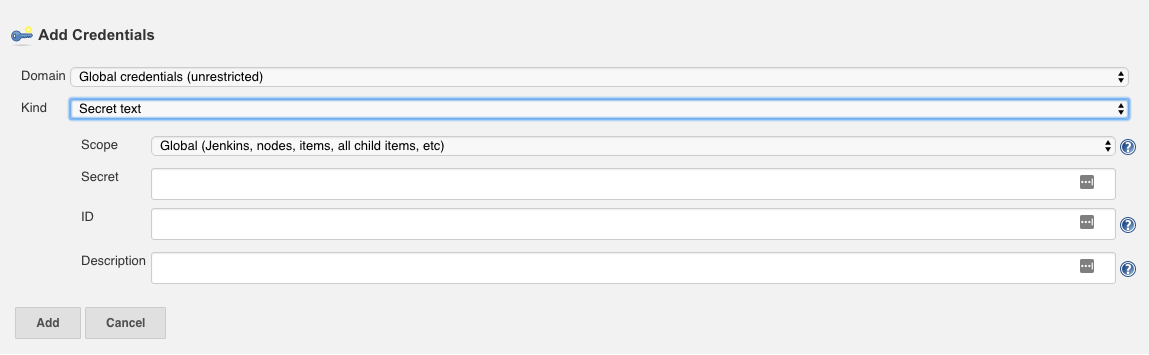
接着将秘钥配置到jenkins中,使得可以下载github中的代码
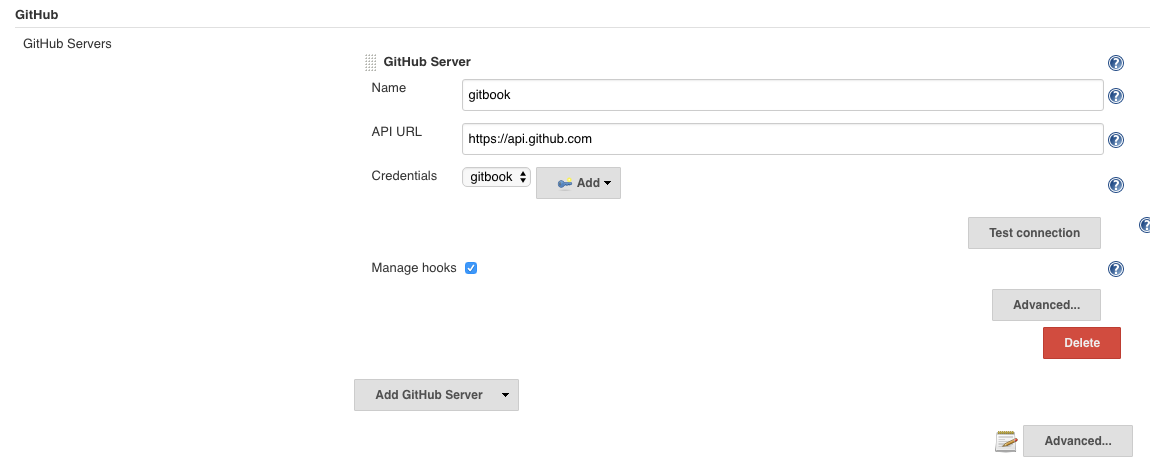
add中配置
这里就是完成了jenkins的配置,接下来在github中配置钩子,当项目发生变化,就调用钩子,打通jenkins
最后就是在jenkins中新建一个job来自动化我们的项目:
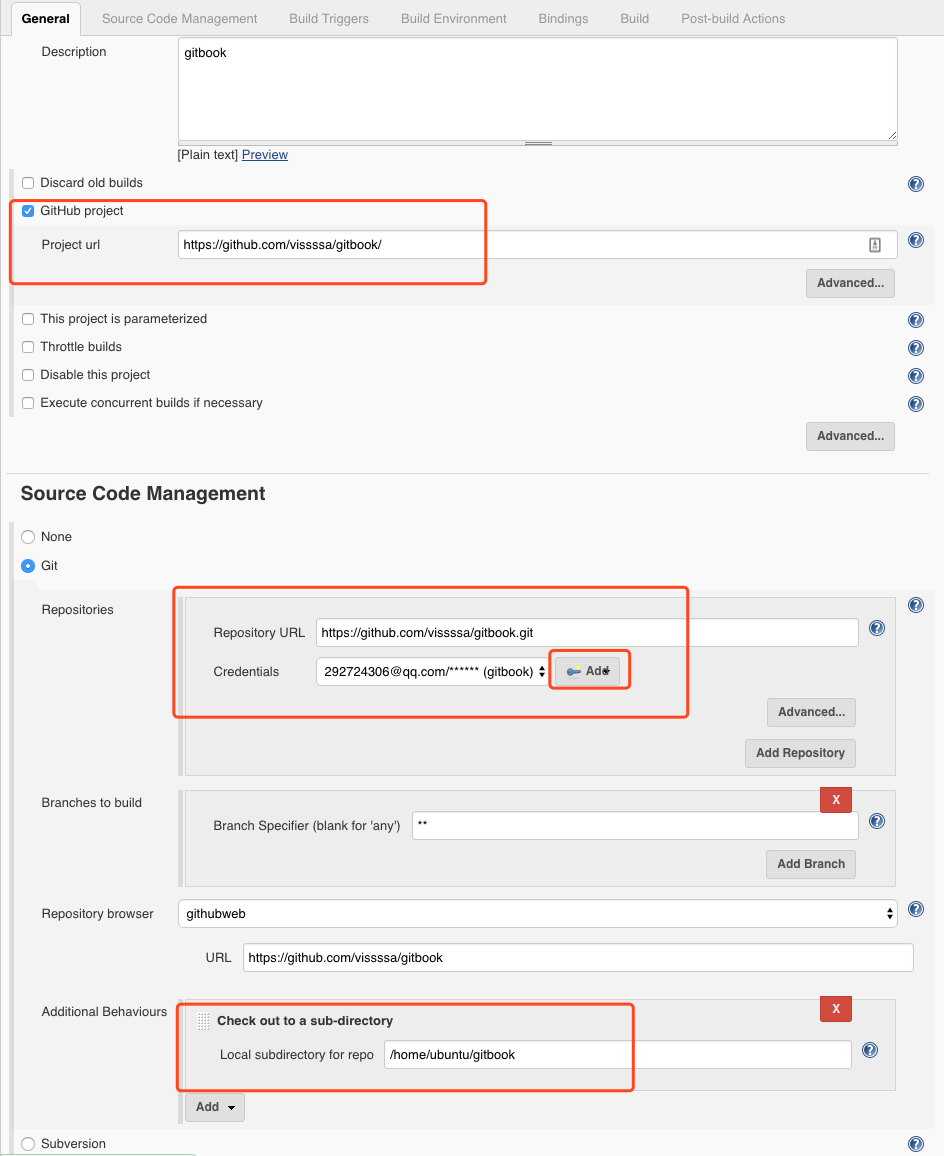
最后一个我们这里填的是项目的地址,因为我这个项目包含大量图片,从github下载慢,所以现在本地已经做好了准备,中间的github需要账号密码,不是秘钥,切记。
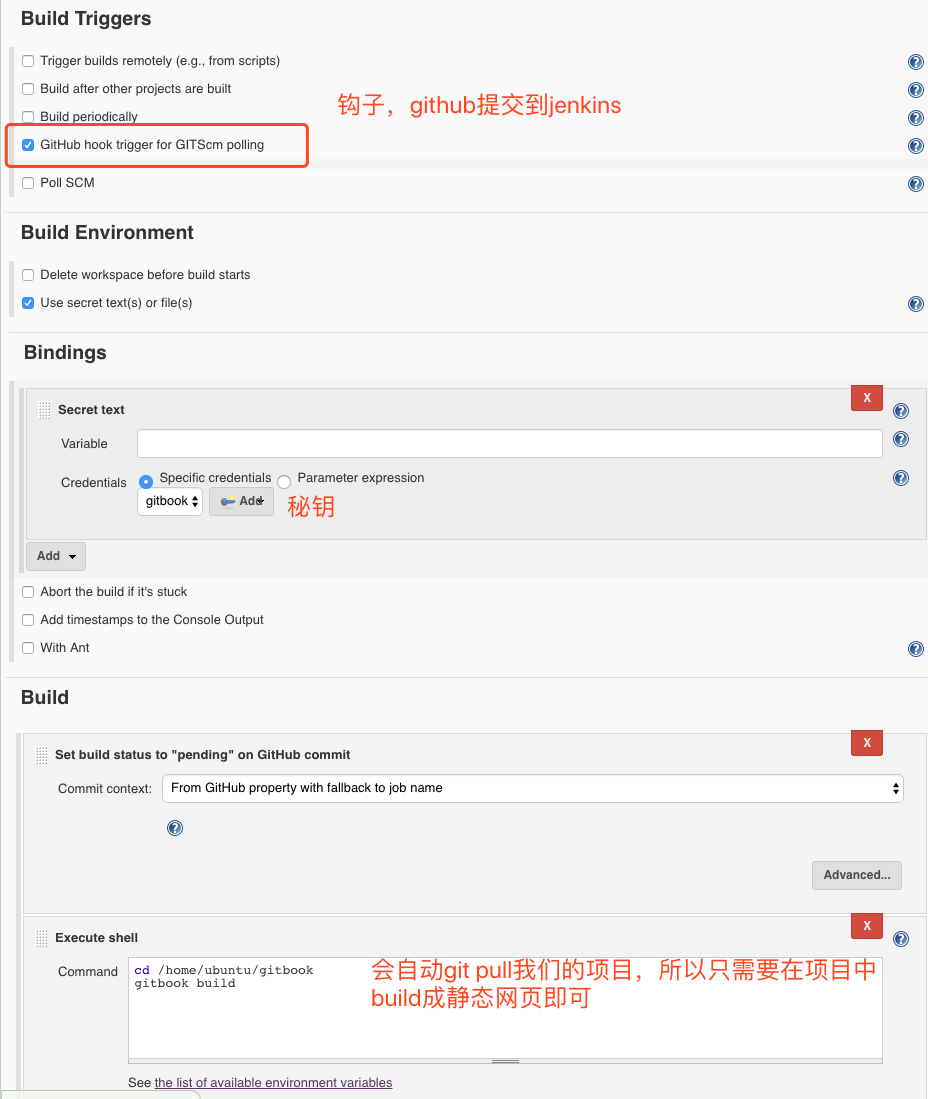
这里就完成了我们这个Jenkins+Github+Gitbook的自动化版本控制以及部署的过程
五、需要注意
因为首先我已经在nginx中配置好了gitbook的路径,所以只需要在项目中编译完成静态网页即可,另外,项目的权限需要开启为所有用户均可rwx,因为jenkins是linux下新建了一个jenkins用户来运行的,对于没有权限的文件,他是无权处理的。
超级坑的jenkins,各种权限以及命令无法找到,经过各种尝试后发现以下可以
修改/etc/sysconfig/jenkins 的用户和组为root
修改gitbook目录为777(有可能不需要,并未尝试了)
更改jenkins 的配置中的shell:
1
2
3cd /home/zhangyu/gitbook
source ~/.bash_profile
/root/.nvm/versions/node/v10.10.0/bin/gitbook build
真的太无语了,垃圾
多天以后我发现磁盘空间满了,经过
1 | find / -size +1024M |
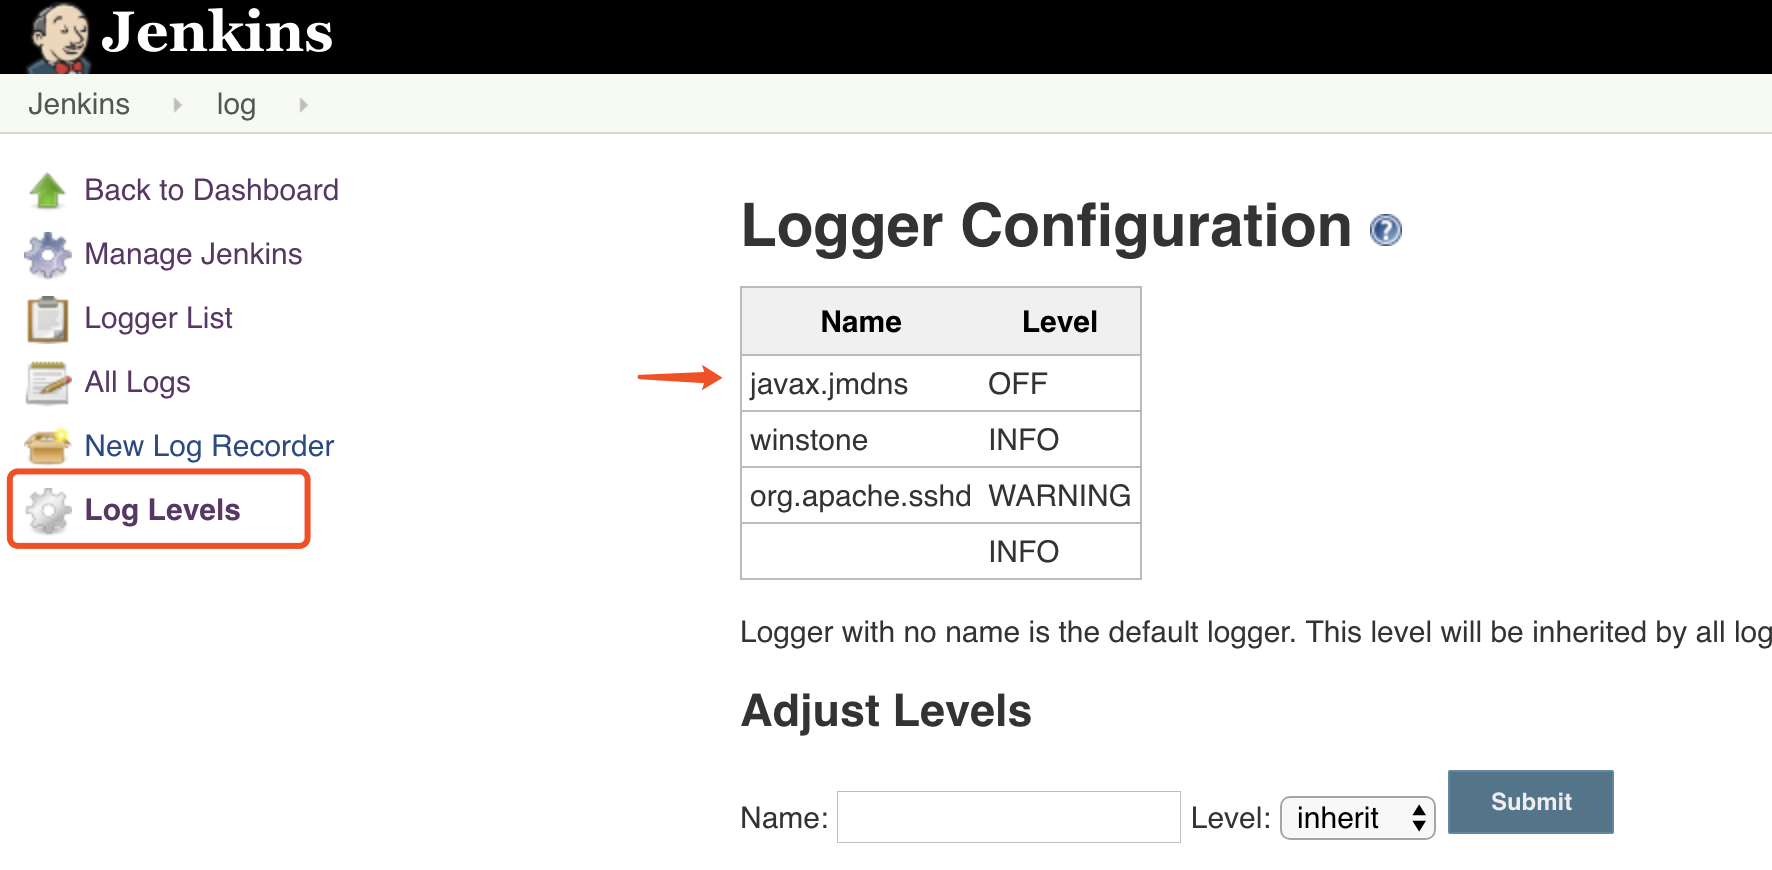
发现是jenkins的日志文件高达37G,删除之后,系统正常,查看资料在jenkins配置中配置相关,怀疑是关于dns的报错信息,这里等待一段时日再来观察是否有效
重启消失,所以只能计划任务,每周删除一次